Dec 28, 2011

Create style using Android Resources Tools

- Start Eclipse, create a new Android project.

- Right click /res/values/ in Package Explorer, click New -> Other....
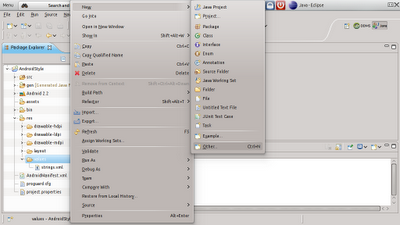

- Expand Android, and select Android XML Values File, click Next.
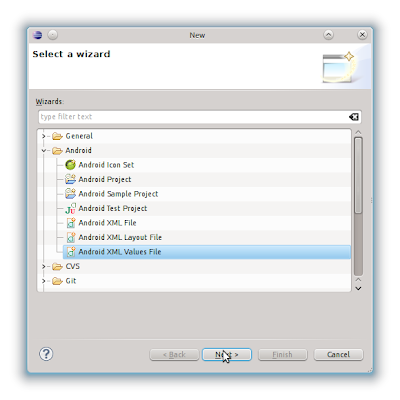

- Enter file name, mystyle.xml.
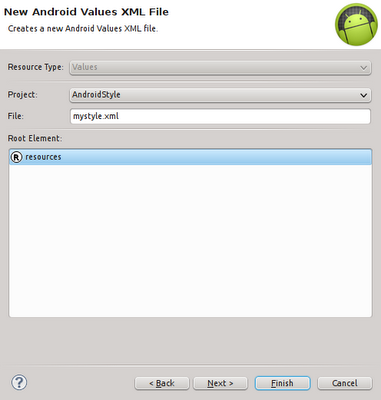

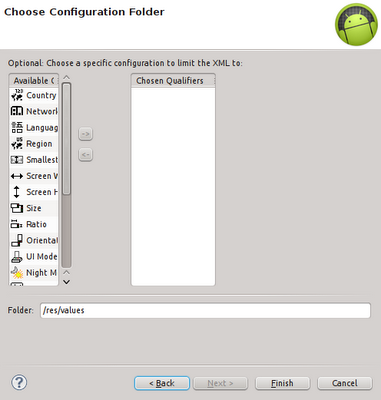
- Click Finish.

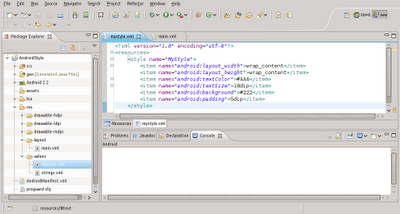
- The generated file will be opened in Resources mode. Click the tab with file name, mystyle.xml, to view in edit mode. The wizard should have create a root of <resources> for you.
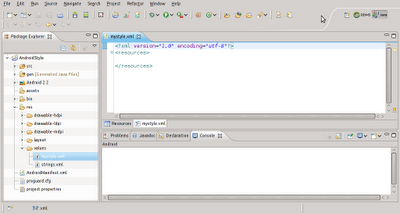

- Switch back to Resources mode by clicking on Resources tab.

- Click on the Add button.
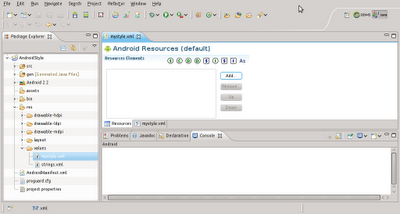

- Select Style/Theme, and click OK.
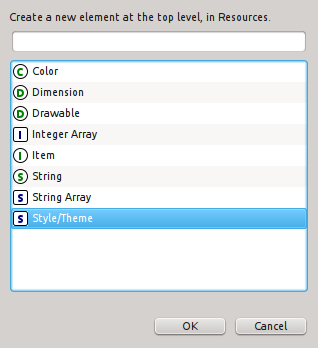

- Enter "MyStyle" in the name field.
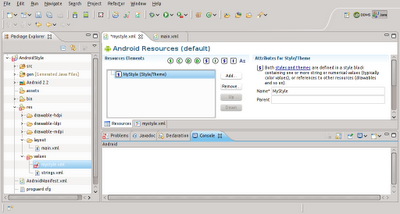

- Click on Add button.

- Select Item and click OK.
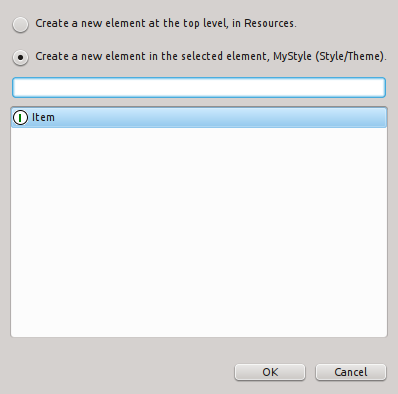

- Enter "android:layout_width" in Name field, and "wrap_content" in Value field.
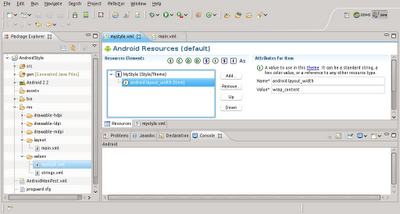

- Click on mystyle.xml tab to view in edit mode. The wizard have already filled in the item.
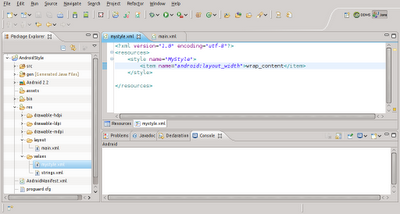

- Repeat to fill in others.
<?xml version="1.0" encoding="utf-8"?>
<resources>
<style name="MyStyle">
<item name="android:layout_width">wrap_content</item>
<item name="android:layout_height">wrap_content</item>
<item name="android:textColor">#AAA</item>
<item name="android:textSize">18dip</item>
<item name="android:background">#222</item>
<item name="android:padding">5dip</item>
</style>

</resources>
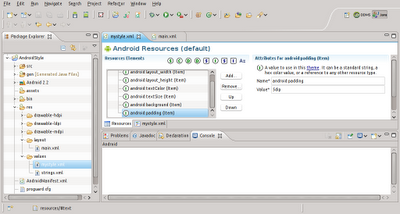


- Save It.

- Modify main.xml to add a TextView using MyStyle.
<?xml version="1.0" encoding="utf-8"?>
<LinearLayout xmlns:android="http://schemas.android.com/apk/res/android"
android:layout_width="fill_parent"
android:layout_height="fill_parent"
android:orientation="vertical" >

<TextView
android:layout_width="fill_parent"
android:layout_height="wrap_content"
android:text="@string/hello" />
<TextView
style="@style/MyStyle"
android:layout_width="fill_parent"
android:text="it's text using style" />

</LinearLayout>


- Finished!
TextView with style


next:
- Create style inheriting properties from another style
- Apply style on whole application/activity as theme
Dec 19, 2011

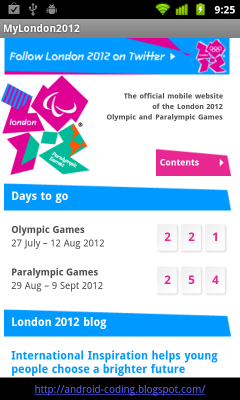
Create your own London 2012 App

London 2012 Olympic is coming! Official site of the London 2012 Olympic (http://www.london2012.com/) have a very nice designed mobile version. You will be redirected to mobile version if you browse http://www.london2012.com/ using mobile device.

So, you can easily create your own London 2012 App for Android by embedding WebView.


Modify main.xml to embed a WebView.
<?xml version="1.0" encoding="utf-8"?>
<LinearLayout xmlns:android="http://schemas.android.com/apk/res/android"
android:layout_width="fill_parent"
android:layout_height="fill_parent"
android:orientation="vertical" >
<RelativeLayout
android:layout_width="fill_parent"
android:layout_height="fill_parent"
android:orientation="vertical" >
<TextView
android:id="@+id/myblog"
android:layout_width="fill_parent"
android:layout_height="wrap_content"
android:text="@string/my_blog"
android:padding="5dp"
android:autoLink="web"
android:gravity="center_horizontal"
android:layout_alignParentBottom="true"/>
<WebView
android:id="@+id/webview"
android:layout_width="fill_parent"
android:layout_height="fill_parent"
android:layout_alignParentTop="true"
android:layout_above="@id/myblog"/>
</RelativeLayout>
</LinearLayout>


Modify /res/values/strings.xml to add String of "my_blog", to advertise me:)
<?xml version="1.0" encoding="utf-8"?>
<resources>

<string name="hello">Hello World, MyLondon2012Activity!</string>
<string name="app_name">MyLondon2012</string>
<string name="my_blog">http://android-coding.blogspot.com/</string>
</resources>


Modify main activity to handle WebView.
package android.coding.myLondon2012;

import android.app.Activity;
import android.os.Bundle;
import android.view.Window;
import android.webkit.WebChromeClient;
import android.webkit.WebView;
import android.webkit.WebViewClient;

public class MyLondon2012Activity extends Activity {

WebView webView;
final String London2012_URL = "http://www.london2012.com/";

/** Called when the activity is first created. */
@Override
public void onCreate(Bundle savedInstanceState) {
super.onCreate(savedInstanceState);
getWindow().requestFeature(Window.FEATURE_PROGRESS);
setContentView(R.layout.main);
webView = (WebView)findViewById(R.id.webview);
webView.getSettings().setJavaScriptEnabled(true);
webView.setWebViewClient(new MyWebViewClient());
webView.loadUrl(London2012_URL);

final Activity activity = this;
webView.setWebChromeClient(new WebChromeClient() {

public void onProgressChanged(WebView view, int progress) {
// Activities and WebViews measure progress with different scales.
// The progress meter will automatically disappear when we reach 100%
activity.setProgress(progress * 100);
}});
}

public class MyWebViewClient extends WebViewClient {

@Override
public boolean shouldOverrideUrlLoading(WebView view, String url) {
view.loadUrl(url);
return true;
}

}
}


Save the icon in /res/drawable/london2012.png


Modify AndroidManifest.xml to enable "android.permission.INTERNET".
<?xml version="1.0" encoding="utf-8"?>
<manifest xmlns:android="http://schemas.android.com/apk/res/android"
package="android.coding.myLondon2012"
android:versionCode="1"
android:versionName="1.0" >

<uses-sdk android:minSdkVersion="8" />
<uses-permission android:name="android.permission.INTERNET"/>

<application
android:icon="@drawable/london2012"
android:label="@string/app_name" >
<activity
android:name=".MyLondon2012Activity"
android:label="@string/app_name" >
<intent-filter>
<action android:name="android.intent.action.MAIN" />

<category android:name="android.intent.category.LAUNCHER" />
</intent-filter>
</activity>
</application>

</manifest>


Download Eclipse project of myLondon2012: http://goo.gl/tg18O
Download Installable APK Android package of myLondon2012: http://goo.gl/28tnz

Related Post:
- android.webkit.WebView
- More on WebView, override url loading
- Enable JavaScript and built-in zoom control of WebView
- Display Progress Bar on WebView when loading
- Handle the Back button in WebView, to back in history


Dec 14, 2011

Copy part of Bitmap

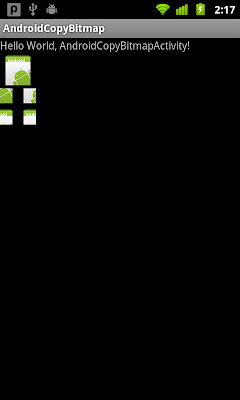
Last post Copy bitmap using getPixels() and setPixels() show how to copy a whole Bitmap using getPixels() and setPixels(). It can be used to copy part of a Bitmap.

Copy part of Bitmap

package com.AndroidCopyBitmap;

import android.app.Activity;
import android.graphics.Bitmap;
import android.graphics.BitmapFactory;
import android.graphics.Matrix;
import android.os.Bundle;
import android.widget.ImageView;

public class AndroidCopyBitmapActivity extends Activity {
/** Called when the activity is first created. */
@Override
public void onCreate(Bundle savedInstanceState) {
super.onCreate(savedInstanceState);
setContentView(R.layout.main);
ImageView image1 = (ImageView)findViewById(R.id.image1);
ImageView image2 = (ImageView)findViewById(R.id.image2);

Bitmap oldBitmap = BitmapFactory.decodeResource(getResources(), R.drawable.ic_launcher);

int orgWidth = oldBitmap.getWidth();
int orgHeight = oldBitmap.getHeight();

int firstx, firsty;
int halfWidth = orgWidth/2;
int halfHeight = orgHeight/2;

//Create a same size Bitmap
Bitmap newBitmap = Bitmap.createBitmap(orgWidth, orgHeight, Bitmap.Config.ARGB_8888);
//Create a pixel of 1/4 size, to copy part of the bitmap
int[] pixels = new int[halfWidth * halfHeight];

//Copy Upper-Left part to Bottom-Right
oldBitmap.getPixels(pixels, 0, halfWidth, 0, 0, halfWidth, halfHeight);
newBitmap.setPixels(pixels, 0, halfWidth, halfWidth, halfHeight, halfWidth, halfHeight);

//Copy Bottom-Right to Upper-Left part
oldBitmap.getPixels(pixels, 0, halfWidth, halfWidth, halfHeight, halfWidth, halfHeight);
newBitmap.setPixels(pixels, 0, halfWidth, 0, 0, halfWidth, halfHeight);

//Copy Bottom-Left part to Upper-Right
oldBitmap.getPixels(pixels, 0, halfWidth, 0, halfHeight, halfWidth, halfHeight);
newBitmap.setPixels(pixels, 0, halfWidth, halfWidth, 0, halfWidth, halfHeight);

//Copy Upper-Right to Bottom-Left part
oldBitmap.getPixels(pixels, 0, halfWidth, halfWidth, 0, halfWidth, halfHeight);
newBitmap.setPixels(pixels, 0, halfWidth, 0, halfHeight, halfWidth, halfHeight);

image1.setImageBitmap(oldBitmap);
image2.setImageBitmap(newBitmap);
}
}


Dec 13, 2011

Copy bitmap using getPixels() and setPixels()

Example of copy bitmap using Bitmap.getPixels() and Bitmap.setPixels().

Copy bitmap using getPixels() and setPixels()

package com.AndroidCopyBitmap;

import android.app.Activity;
import android.graphics.Bitmap;
import android.graphics.BitmapFactory;
import android.graphics.Matrix;
import android.os.Bundle;
import android.widget.ImageView;

public class AndroidCopyBitmapActivity extends Activity {
/** Called when the activity is first created. */
@Override
public void onCreate(Bundle savedInstanceState) {
super.onCreate(savedInstanceState);
setContentView(R.layout.main);
ImageView image1 = (ImageView)findViewById(R.id.image1);
ImageView image2 = (ImageView)findViewById(R.id.image2);

Bitmap oldBitmap = BitmapFactory.decodeResource(getResources(), R.drawable.ic_launcher);

int orgWidth = oldBitmap.getWidth();
int orgHeight = oldBitmap.getHeight();

Bitmap newBitmap = Bitmap.createBitmap(orgWidth, orgHeight, Bitmap.Config.ARGB_8888);
int[] pixels = new int[orgWidth * orgHeight];
oldBitmap.getPixels(pixels, 0, orgWidth, 0, 0, orgWidth, orgHeight);
newBitmap.setPixels(pixels, 0, orgWidth, 0, 0, orgWidth, orgHeight);

image1.setImageBitmap(oldBitmap);
image2.setImageBitmap(newBitmap);
}
}


<?xml version="1.0" encoding="utf-8"?>
<LinearLayout xmlns:android="http://schemas.android.com/apk/res/android"
android:layout_width="fill_parent"
android:layout_height="fill_parent"
android:orientation="vertical" >

<TextView
android:layout_width="fill_parent"
android:layout_height="wrap_content"
android:text="@string/hello" />
<ImageView
android:id="@+id/image1"
android:layout_width="wrap_content"
android:layout_height="wrap_content" />
<ImageView
android:id="@+id/image2"
android:layout_width="wrap_content"
android:layout_height="wrap_content" />

</LinearLayout>

next:
- Copy part of Bitmap


Dec 12, 2011

Scale Bitmap

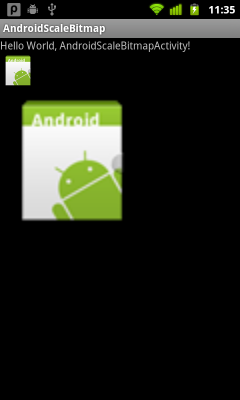
To scale bitmap, we can use the following code:
Matrix matrix = new Matrix();
matrix.postScale(xScale, yScale);
Bitmap newBitmap = Bitmap.createBitmap(oldBitmap, 0, 0, orgWidth, orgHeight, matrix, true);


example:

Scale Bitmap

package com.AndroidScaleBitmap;

import android.app.Activity;
import android.graphics.Bitmap;
import android.graphics.BitmapFactory;
import android.graphics.Matrix;
import android.os.Bundle;
import android.widget.ImageView;

public class AndroidScaleBitmapActivity extends Activity {
/** Called when the activity is first created. */
@Override
public void onCreate(Bundle savedInstanceState) {
super.onCreate(savedInstanceState);
setContentView(R.layout.main);

ImageView image1 = (ImageView)findViewById(R.id.image1);
ImageView image2 = (ImageView)findViewById(R.id.image2);

Bitmap oldBitmap = BitmapFactory.decodeResource(getResources(), R.drawable.ic_launcher);

int orgWidth = oldBitmap.getWidth();
int orgHeight = oldBitmap.getHeight();
int newWidth = 300;
int newHeight = 300;
float xScale = newWidth/orgWidth;
float yScale = newHeight/orgHeight;

Matrix matrix = new Matrix();
matrix.postScale(xScale, yScale);
Bitmap newBitmap = Bitmap.createBitmap(oldBitmap, 0, 0, orgWidth, orgHeight, matrix, true);

image1.setImageBitmap(oldBitmap);
image2.setImageBitmap(newBitmap);
}
}


<?xml version="1.0" encoding="utf-8"?>
<LinearLayout xmlns:android="http://schemas.android.com/apk/res/android"
android:layout_width="fill_parent"
android:layout_height="fill_parent"
android:orientation="vertical" >

<TextView
android:layout_width="fill_parent"
android:layout_height="wrap_content"
android:text="@string/hello" />
<ImageView
android:id="@+id/image1"
android:layout_width="wrap_content"
android:layout_height="wrap_content" />
<ImageView
android:id="@+id/image2"
android:layout_width="wrap_content"
android:layout_height="wrap_content" />

</LinearLayout>


Dec 2, 2011

Dynamic change the content of Spinner

In the last post Apply List to Spinner, the content of Spinner is come from a List. We can change the List programmatically, to change the content of the Spinner, then call notifyDataSetChanged() of the ArrayAdapter to update the Spinner.

It's a example modify from the last post. There are two Spinner. When the Move button clicked, the current item of Spinner1 will be moved to Spinner2.

Dynamic change the content of Spinner

package com.AndroidListSpinner;
import java.util.ArrayList;
import java.util.List;

import android.app.Activity;
import android.os.Bundle;
import android.view.View;
import android.widget.AdapterView;
import android.widget.ArrayAdapter;
import android.widget.Button;
import android.widget.Spinner;

public class AndroidListSpinnerActivity extends Activity {

Button btnMove;
Spinner MySpinner1, MySpinner2;
List<String> myList1, myList2;
private ArrayAdapter<String> myAdapter1, myAdapter2;

/** Called when the activity is first created. */
@Override
public void onCreate(Bundle savedInstanceState) {
super.onCreate(savedInstanceState);
setContentView(R.layout.main);
btnMove = (Button)findViewById(R.id.move);
MySpinner1 = (Spinner)findViewById(R.id.myspinner1);
MySpinner2 = (Spinner)findViewById(R.id.myspinner2);

initList();
myAdapter1 = new ArrayAdapter<String>(this, android.R.layout.simple_spinner_item, myList1);
myAdapter1.setDropDownViewResource(android.R.layout.simple_spinner_dropdown_item);
MySpinner1.setAdapter(myAdapter1);

myAdapter2 = new ArrayAdapter<String>(this, android.R.layout.simple_spinner_item, myList2);
myAdapter2.setDropDownViewResource(android.R.layout.simple_spinner_dropdown_item);
MySpinner2.setAdapter(myAdapter2);

btnMove.setOnClickListener(MoveOnClickListener);
}

Button.OnClickListener MoveOnClickListener
= new Button.OnClickListener(){

@Override
public void onClick(View arg0) {
// TODO Auto-generated method stub
int pos = MySpinner1.getSelectedItemPosition();

if(pos != AdapterView.INVALID_POSITION){
myList2.add(myList1.get(pos));
myList1.remove(pos);
myAdapter1.notifyDataSetChanged();
myAdapter2.notifyDataSetChanged();
}
}};

void initList(){
myList1 = new ArrayList<String>();
myList1.add("Sunday");
myList1.add("Monday");
myList1.add("Tuesday");
myList1.add("Wednesday");
myList1.add("Thursday");
myList1.add("Friday");
myList1.add("Saturday");

myList2 = new ArrayList<String>();
}
}


<?xml version="1.0" encoding="utf-8"?>
<LinearLayout xmlns:android="http://schemas.android.com/apk/res/android"
android:layout_width="fill_parent"
android:layout_height="fill_parent"
android:orientation="vertical" >

<TextView
android:layout_width="fill_parent"
android:layout_height="wrap_content"
android:text="@string/hello" />
<Spinner
android:id="@+id/myspinner1"
android:layout_width="fill_parent"
android:layout_height="wrap_content" />
<Spinner
android:id="@+id/myspinner2"
android:layout_width="fill_parent"
android:layout_height="wrap_content" />
<Button
android:id="@+id/move"
android:layout_width="fill_parent"
android:layout_height="wrap_content"
android:text="Move" />

</LinearLayout>


Apply List to Spinner

Apply List to Spinner

<?xml version="1.0" encoding="utf-8"?>
<LinearLayout xmlns:android="http://schemas.android.com/apk/res/android"
android:layout_width="fill_parent"
android:layout_height="fill_parent"
android:orientation="vertical" >

<TextView
android:layout_width="fill_parent"
android:layout_height="wrap_content"
android:text="@string/hello" />
<Spinner
android:id="@+id/myspinner"
android:layout_width="fill_parent"
android:layout_height="wrap_content" />

</LinearLayout>


package com.AndroidListSpinner;
import java.util.ArrayList;
import java.util.List;

import android.app.Activity;
import android.os.Bundle;
import android.widget.ArrayAdapter;
import android.widget.Spinner;

public class AndroidListSpinnerActivity extends Activity {

Spinner MySpinner;
List<String> myList;
private ArrayAdapter<String> myAdapter;

/** Called when the activity is first created. */
@Override
public void onCreate(Bundle savedInstanceState) {
super.onCreate(savedInstanceState);
setContentView(R.layout.main);
MySpinner = (Spinner)findViewById(R.id.myspinner);

initList();
myAdapter = new ArrayAdapter<String>(this, android.R.layout.simple_spinner_item, myList);
myAdapter.setDropDownViewResource(android.R.layout.simple_spinner_dropdown_item);
MySpinner.setAdapter(myAdapter);
}

void initList(){
myList = new ArrayList<String>();
myList.add("Sunday");
myList.add("Monday");
myList.add("Tuesday");
myList.add("Wednesday");
myList.add("Thursday");
myList.add("Friday");
myList.add("Saturday");
}
}


Related Post:
- Apply array to Spinner
- Dynamic change the content of Spinner

Dec 1, 2011

Remove from DownloadManager

Modify from last post Download using DownloadManager, the downloaded SUCCESSFUL id can be removed using downloadManager.remove(downloadID).

package com.AndroidDownload;

import java.io.FileNotFoundException;

import android.app.Activity;
import android.app.DownloadManager;
import android.content.BroadcastReceiver;
import android.content.Context;
import android.content.Intent;
import android.content.IntentFilter;
import android.content.SharedPreferences;
import android.content.SharedPreferences.Editor;
import android.database.Cursor;
import android.net.Uri;
import android.os.Bundle;
import android.os.ParcelFileDescriptor;
import android.preference.PreferenceManager;
import android.view.View;
import android.widget.Button;
import android.widget.Toast;

public class AndroidDownloadActivity extends Activity {

String Download_path = "http://goo.gl/Mfyya";
String Download_ID = "DOWNLOAD_ID";

SharedPreferences preferenceManager;
DownloadManager downloadManager;

/** Called when the activity is first created. */
@Override
public void onCreate(Bundle savedInstanceState) {
super.onCreate(savedInstanceState);
setContentView(R.layout.main);

preferenceManager = PreferenceManager.getDefaultSharedPreferences(this);
downloadManager = (DownloadManager)getSystemService(DOWNLOAD_SERVICE);

Button btnDownload = (Button)findViewById(R.id.download);
btnDownload.setOnClickListener(new Button.OnClickListener(){

@Override
public void onClick(View arg0) {
// TODO Auto-generated method stub
Uri Download_Uri = Uri.parse(Download_path);
DownloadManager.Request request = new DownloadManager.Request(Download_Uri);
long download_id = downloadManager.enqueue(request);

//Save the download id
Editor PrefEdit = preferenceManager.edit();
PrefEdit.putLong(Download_ID, download_id);
PrefEdit.commit();
}});
}

@Override
protected void onResume() {
// TODO Auto-generated method stub
super.onResume();

IntentFilter intentFilter = new IntentFilter(DownloadManager.ACTION_DOWNLOAD_COMPLETE);
registerReceiver(downloadReceiver, intentFilter);
}

@Override
protected void onPause() {
// TODO Auto-generated method stub
super.onPause();

unregisterReceiver(downloadReceiver);
}

private BroadcastReceiver downloadReceiver = new BroadcastReceiver() {

@Override
public void onReceive(Context arg0, Intent arg1) {
// TODO Auto-generated method stub
DownloadManager.Query query = new DownloadManager.Query();
query.setFilterById(preferenceManager.getLong(Download_ID, 0));
Cursor cursor = downloadManager.query(query);

if(cursor.moveToFirst()){
int columnIndex = cursor.getColumnIndex(DownloadManager.COLUMN_STATUS);
int status = cursor.getInt(columnIndex);
int columnReason = cursor.getColumnIndex(DownloadManager.COLUMN_REASON);
int reason = cursor.getInt(columnReason);

if(status == DownloadManager.STATUS_SUCCESSFUL){
//Retrieve the saved download id
long downloadID = preferenceManager.getLong(Download_ID, 0);

ParcelFileDescriptor file;
try {
file = downloadManager.openDownloadedFile(downloadID);
Toast.makeText(AndroidDownloadActivity.this,
"File Downloaded: " + file.toString(),
Toast.LENGTH_LONG).show();
} catch (FileNotFoundException e) {
// TODO Auto-generated catch block
e.printStackTrace();
Toast.makeText(AndroidDownloadActivity.this,
e.toString(),
Toast.LENGTH_LONG).show();
}

downloadManager.remove(downloadID);

}else if(status == DownloadManager.STATUS_FAILED){
Toast.makeText(AndroidDownloadActivity.this,
"FAILED!\n" + "reason of " + reason,
Toast.LENGTH_LONG).show();
}else if(status == DownloadManager.STATUS_PAUSED){
Toast.makeText(AndroidDownloadActivity.this,
"PAUSED!\n" + "reason of " + reason,
Toast.LENGTH_LONG).show();
}else if(status == DownloadManager.STATUS_PENDING){
Toast.makeText(AndroidDownloadActivity.this,
"PENDING!",
Toast.LENGTH_LONG).show();
}else if(status == DownloadManager.STATUS_RUNNING){
Toast.makeText(AndroidDownloadActivity.this,
"RUNNING!",
Toast.LENGTH_LONG).show();
}
}
}

};

}


Infolinks In Text Ads