Aug 28, 2011

Load local HTML from /assets

We can load local HTML (under /assets folder) in WebView.

Load local HTML from /assets

Modify from the former post Handle the Back button in WebView, to back in history.

Create our local HTML, /assets/myweb.html.
<!DOCTYPE html>

<html>
<head>
<meta charset="UTF-8">
<meta name="viewport" content="width=device-width; user-scalable=0;" />
<title>Android Coding</title>
</head>
<body>

<h1>Hello!</h1>
It's a local html in /assets.<br/>
Visit <a href="http://android-coding.blogspot.com/?m=1">Android Coding</a>

</body>
</html>


Load the local HTML in Java code:

final String DEFAULT_URL = "file:///android_asset/myweb.html";

webView.loadUrl(DEFAULT_URL);


Aug 26, 2011

Load ListView contents from XML resources

In the last posts A simple ListView using android.R.layout.simple_list_item_1 layout and ListView with your own layout; contents of ListView is defined in Java code. It can be defined in XML resources, and fill in ArrayAdapter by calling ArrayAdapter.createFromResource() method.

Create /res/values/month.xml file
<?xml version="1.0" encoding="utf-8"?>

<resources>
<string-array name="month">
<item>January</item>
<item>February</item>
<item>March</item>
<item>April</item>
<item>May</item>
<item>June</item>
<item>July</item>
<item>August</item>
<item>September</item>
<item>October</item>
<item>November</item>
<item>December</item>
</string-array>
</resources>


Modify onCreate() to create ArrayAdapter from resource.
    @Override

public void onCreate(Bundle savedInstanceState) {
super.onCreate(savedInstanceState);
setContentView(R.layout.main);
myList = (ListView)findViewById(R.id.list);

ArrayAdapter<CharSequence> adapter
= ArrayAdapter.createFromResource(this,
R.array.month,
R.layout.mylistlayout);

myList.setAdapter(adapter);

}


Related:

- ListView with multiple choice


Aug 25, 2011

ListView with your own layout

As stated in last post, A simple ListView using android.R.layout.simple_list_item_1 layout, we can copy and modify the built-in layout to implement our own layout in ListView.

ListView with your own layout

Copy the file android-sdk-linux_x86/platforms/android-7/data/res/layout/layout/simple_list_item_1.xml, rename mylistlayout.xml, and paste into /res/layout/ folder of your project. Modify it:
/res/layout/mylistlayout.xml
<?xml version="1.0" encoding="utf-8"?>

<TextView xmlns:android="http://schemas.android.com/apk/res/android"
android:id="@android:id/text1"
android:layout_width="fill_parent"
android:layout_height="wrap_content"
android:textStyle="bold|italic"
android:gravity="center_vertical|right"
android:paddingRight="30dip"
android:minHeight="?android:attr/listPreferredItemHeight"
android:drawableLeft="@drawable/icon"
/>


Modify the onCreate() method to use R.layout.mylistlayout in our ListView
    @Override

public void onCreate(Bundle savedInstanceState) {
super.onCreate(savedInstanceState);
setContentView(R.layout.main);
myList = (ListView)findViewById(R.id.list);

ArrayAdapter<String> adapter
= new ArrayAdapter<String>(this,
R.layout.mylistlayout,
listContent);
myList.setAdapter(adapter);

}


next:
- Load ListView contents from XML resources

A simple ListView using android.R.layout.simple_list_item_1 layout

It's a very simple and standard example of ListView, using the built-in layout android.R.layout.simple_list_item_1 layout.

A simple ListView using android.R.layout.simple_list_item_1 layout

package com.AndroidListView;


import android.app.Activity;
import android.os.Bundle;
import android.widget.ArrayAdapter;
import android.widget.ListView;

public class AndroidListViewActivity extends Activity {

ListView myList;

String[] listContent = {
"January",
"February",
"March",
"April",
"May",
"June",
"July",
"August",
"September",
"October",
"November",
"December"
};

/** Called when the activity is first created. */
@Override
public void onCreate(Bundle savedInstanceState) {
super.onCreate(savedInstanceState);
setContentView(R.layout.main);
myList = (ListView)findViewById(R.id.list);

ArrayAdapter<String> adapter
= new ArrayAdapter<String>(this,
android.R.layout.simple_list_item_1,
listContent);
myList.setAdapter(adapter);

}
}


<?xml version="1.0" encoding="utf-8"?>

<LinearLayout xmlns:android="http://schemas.android.com/apk/res/android"
android:orientation="vertical"
android:layout_width="fill_parent"
android:layout_height="fill_parent"
>
<TextView
android:layout_width="fill_parent"
android:layout_height="wrap_content"
android:text="@string/hello"
/>
<ListView
android:id="@+id/list"
android:layout_width="fill_parent"
android:layout_height="wrap_content"
/>
</LinearLayout>


But...what's android.R.layout.simple_list_item_1. You can check it in <android-sdk>/platforms/<android-version>/data/res/layout/simple_list_item_1.xml. Such that you can copy and modify it for your own.


For example, the content of android-sdk-linux_x86/platforms/android-7/data/res/layout/layout/simple_list_item_1.xml is:
<?xml version="1.0" encoding="utf-8"?>

<!-- Copyright (C) 2006 The Android Open Source Project

Licensed under the Apache License, Version 2.0 (the "License");
you may not use this file except in compliance with the License.
You may obtain a copy of the License at

http://www.apache.org/licenses/LICENSE-2.0

Unless required by applicable law or agreed to in writing, software
distributed under the License is distributed on an "AS IS" BASIS,
WITHOUT WARRANTIES OR CONDITIONS OF ANY KIND, either express or implied.
See the License for the specific language governing permissions and
limitations under the License.
-->

<TextView xmlns:android="http://schemas.android.com/apk/res/android"
android:id="@android:id/text1"
android:layout_width="fill_parent"
android:layout_height="wrap_content"
android:textAppearance="?android:attr/textAppearanceLarge"
android:gravity="center_vertical"
android:paddingLeft="6dip"
android:minHeight="?android:attr/listPreferredItemHeight"
/>


Related:

- Load ListView contents from XML resources

- ListView with multiple choice

- Simple GridView example


Aug 18, 2011

Handle the Back button in WebView, to back in history.

Normally, we will have a Back button on browser, for user to go back in history. The default behaviour of the BACK button on Android system is Exiting the app. In order to change it's behaviour, we can override the onKeyDown() method: if it's BACK button pressed AND there has a back history item, than go back; otherwise pass to super method to handle as normal.

    @Override
public boolean onKeyDown(int keyCode, KeyEvent event) {

if (keyCode == KeyEvent.KEYCODE_BACK){
if(webView.canGoBack()){
webView.goBack();
return true;
}
}
return super.onKeyDown(keyCode, event);
}


Related Post:

- Display Progress Bar on WebView when loading


next:

- Load local HTML from /assets


related:
- Create your own London 2012 App


Aug 17, 2011

Display Progress Bar on WebView when loading

Continuous work on last post Enable JavaScript and built-in zoom control of WebView; to display progress bar on WebView when loading:

Display Progress Bar on WebView when loading

- Request feature of Window.FEATURE_PROGRESS:
Add the code getWindow().requestFeature(Window.FEATURE_PROGRESS) before setContentView().

- Implement your custom WebChromeClient class with onProgressChanged() method overrided, to call setProgress() method.

- Updated onCreate() should like this:
    public void onCreate(Bundle savedInstanceState) {
super.onCreate(savedInstanceState);

getWindow().requestFeature(Window.FEATURE_PROGRESS);
setContentView(R.layout.main);

webView = (WebView)findViewById(R.id.webview);
webView.getSettings().setJavaScriptEnabled(true);
webView.getSettings().setBuiltInZoomControls(true);
webView.setWebViewClient(new MyWebViewClient());
webView.loadUrl(DEFAULT_URL);

final Activity activity = this;
webView.setWebChromeClient(new WebChromeClient() {
public void onProgressChanged(WebView view, int progress) {
// Activities and WebViews measure progress with different scales.
// The progress meter will automatically disappear when we reach 100%
activity.setProgress(progress * 100);

}});

}


next:
- Handle the Back button in WebView, to back in history.

related:
- Create your own London 2012 App


Aug 16, 2011

Enable JavaScript and built-in zoom control of WebView

To enable JavaScript and built-in zoom control of WebView, we can call setJavaScriptEnabled(true) and setBuiltInZoomControls(true) functions of WebSettings class.

Enable JavaScript and built-in zoom control of WebView

Modify onCreate() method in last post More on WebView, override url loading.

    public void onCreate(Bundle savedInstanceState) {

super.onCreate(savedInstanceState);
setContentView(R.layout.main);
webView = (WebView)findViewById(R.id.webview);
webView.getSettings().setJavaScriptEnabled(true);
webView.getSettings().setBuiltInZoomControls(true);
webView.setWebViewClient(new MyWebViewClient());
webView.loadUrl(DEFAULT_URL);

}


next post:
- Display Progress Bar on WebView when loading

Aug 15, 2011

More on WebView, override url loading

In the post android.webkit.WebView, we have implemented a very dummy web browser. But...once user click on a link, the default Android Browser will be opened to view the web page. To keep using our WebView to handle the event, we can implement a new class (MyWebViewClient) extends WebViewClient, and override the shouldOverrideUrlLoading() method, to take over the control when a new url is about to be loaded in the current WebView.

We have to call setWebViewClient() to set our WebViewClient to receive various notifications and requests.

package com.AndroidWebView;


import android.app.Activity;
import android.os.Bundle;
import android.webkit.WebView;
import android.webkit.WebViewClient;

public class AndroidWebViewActivity extends Activity {

WebView webView;
final String DEFAULT_URL = "http://android-coding.blogspot.com/?m=1";

/** Called when the activity is first created. */
@Override
public void onCreate(Bundle savedInstanceState) {
super.onCreate(savedInstanceState);
setContentView(R.layout.main);
webView = (WebView)findViewById(R.id.webview);
webView.setWebViewClient(new MyWebViewClient());
webView.loadUrl(DEFAULT_URL);

}

public class MyWebViewClient extends WebViewClient {

@Override
public boolean shouldOverrideUrlLoading(WebView view, String url) {
// TODO Auto-generated method stub
view.loadUrl(url);
return true;
}
}
}


next:
- Enable JavaScript and built-in zoom control of WebView

Aug 14, 2011

Example of using CheckBoxPreference

Example of using CheckBoxPreference

- Create a xml file, to define the CheckBoxPreference, /res/xml/checkboxpref.xml.
<?xml version="1.0" encoding="utf-8"?>

<PreferenceScreen xmlns:android="http://schemas.android.com/apk/res/android"
android:key="checkbox_pref"
android:title="Check Box Preferences">
<CheckBoxPreference
android:key="pref_opt1"
android:title="Opt 1"
android:summary="option 1"
android:defaultValue="true"/>
<CheckBoxPreference
android:key="pref_opt2"
android:title="Opt 2"
android:summary="option 2" />
<CheckBoxPreference
android:key="pref_opt3"
android:title="Opt 3"
android:summary="option 3" />
<CheckBoxPreference
android:key="pref_opt4"
android:title="Opt 4"
android:summary="option 4" />
</PreferenceScreen>


- Create a SetPreference.java extends PreferenceActivity, it simple call the function addPreferencesFromResource(R.xml.checkboxpref) in onCreate().
package com.AndroidCheckBoxPreference;


import android.os.Bundle;
import android.preference.PreferenceActivity;

public class SetPreference extends PreferenceActivity {

@Override
protected void onCreate(Bundle savedInstanceState) {
// TODO Auto-generated method stub
super.onCreate(savedInstanceState);
addPreferencesFromResource(R.xml.checkboxpref);
}

}


- Modify the layout main.xml to have a TextView to show the preferences, and a Button to start SetPreference.java.
<?xml version="1.0" encoding="utf-8"?>

<LinearLayout xmlns:android="http://schemas.android.com/apk/res/android"
android:orientation="vertical"
android:layout_width="fill_parent"
android:layout_height="fill_parent"
>
<TextView
android:layout_width="fill_parent"
android:layout_height="wrap_content"
android:text="@string/hello"
/>
<TextView
android:id="@+id/pref"
android:layout_width="fill_parent"
android:layout_height="wrap_content"
/>
<Button
android:id="@+id/setpref"
android:layout_width="fill_parent"
android:layout_height="wrap_content"
android:text="Set Preferences"
/>
</LinearLayout>


- Main code
package com.AndroidCheckBoxPreference;


import android.app.Activity;
import android.content.Intent;
import android.content.SharedPreferences;
import android.os.Bundle;
import android.preference.PreferenceManager;
import android.view.View;
import android.widget.Button;
import android.widget.TextView;

public class AndroidCheckBoxPreferenceActivity extends Activity {

TextView pref;
Button setPref;

/** Called when the activity is first created. */
@Override
public void onCreate(Bundle savedInstanceState) {
super.onCreate(savedInstanceState);
setContentView(R.layout.main);
pref = (TextView)findViewById(R.id.pref);
setPref = (Button)findViewById(R.id.setpref);

setPref.setOnClickListener(new Button.OnClickListener(){

@Override
public void onClick(View arg0) {
// TODO Auto-generated method stub
Intent intent = new Intent(
AndroidCheckBoxPreferenceActivity.this,
SetPreference.class);
startActivityForResult(intent, 0);
}});

checkPref();
}

private void checkPref(){
SharedPreferences myPref
= PreferenceManager.getDefaultSharedPreferences(
AndroidCheckBoxPreferenceActivity.this);
String _pref =
"Option 1: " + myPref.getBoolean("pref_opt1", true) + "\n"
+ "Option 2: " + myPref.getBoolean("pref_opt2", false) + "\n"
+ "Option 3: " + myPref.getBoolean("pref_opt3", false) + "\n"
+ "Option 4: " + myPref.getBoolean("pref_opt4", false);

pref.setText(_pref);
}

@Override
protected void onActivityResult(int requestCode, int resultCode, Intent data) {
// TODO Auto-generated method stub
super.onActivityResult(requestCode, resultCode, data);
checkPref();
}
}


- Modify AndroidManifest.xml to add activity of SetPreference.java
<?xml version="1.0" encoding="utf-8"?>

<manifest xmlns:android="http://schemas.android.com/apk/res/android"
package="com.AndroidCheckBoxPreference"
android:versionCode="1"
android:versionName="1.0">
<uses-sdk android:minSdkVersion="4" />

<application android:icon="@drawable/icon" android:label="@string/app_name">
<activity android:name=".AndroidCheckBoxPreferenceActivity"
android:label="@string/app_name">
<intent-filter>
<action android:name="android.intent.action.MAIN" />
<category android:name="android.intent.category.LAUNCHER" />
</intent-filter>
</activity>
<activity android:name=".SetPreference"/>
</application>
</manifest>


Aug 13, 2011

Check if a app is instlled

In the last two posts Start a specified app and Start a specified app with data passed, it's assumed that the slave app is installed. In order to check if it's installed, we can call PackageManager.queryIntentActivities().

	private void startSlave(String passingText){

Intent intent = new Intent();
intent.setClassName(PACKAGE_NAME, CLASS_NAME);

Bundle bundle = new Bundle();
bundle.putString("key", passingText);
intent.putExtras(bundle);

//check if the slave app installed
List<ResolveInfo> list = getPackageManager().queryIntentActivities(
intent,
PackageManager.MATCH_DEFAULT_ONLY);

if (list.size() >0 ){
//Yes, the Slave App installed
startActivity(intent);
}else{
//No!
Toast.makeText(AndroidMasterActivity.this,
"Slave App not yet installed!",
Toast.LENGTH_LONG).show();
}
}


Start a specified app with data passed

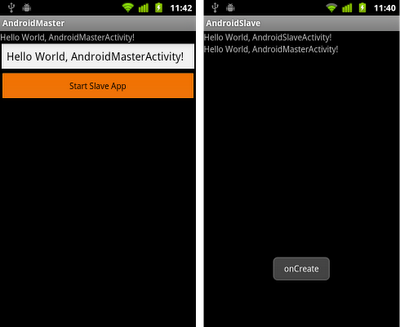
In the post Start a specified app, the slave app is satrted without any data passed. Data can be passed from master app to slave app in bundle.

Start a specified app with data passed

Master App:
package com.test.AndroidMaster;


import android.app.Activity;
import android.content.Intent;
import android.os.Bundle;
import android.view.View;
import android.widget.Button;
import android.widget.EditText;

public class AndroidMasterActivity extends Activity {

final static String PACKAGE_NAME = "com.test.AndroidSlave";
final static String CLASS_NAME = "com.test.AndroidSlave.AndroidSlaveActivity";

EditText textIn;
Button btnStartSlave;

/** Called when the activity is first created. */
@Override
public void onCreate(Bundle savedInstanceState) {
super.onCreate(savedInstanceState);
setContentView(R.layout.main);
textIn = (EditText)findViewById(R.id.input);
btnStartSlave = (Button)findViewById(R.id.startalave);
btnStartSlave.setOnClickListener(new Button.OnClickListener(){

@Override
public void onClick(View arg0) {
// TODO Auto-generated method stub
String textToBePassed = textIn.getText().toString();
startSlave(textToBePassed);
}});
}

private void startSlave(String passingText){
Intent intent = new Intent();
intent.setClassName(PACKAGE_NAME, CLASS_NAME);

Bundle bundle = new Bundle();
bundle.putString("key", passingText);
intent.putExtras(bundle);

startActivity(intent);
}
}


<?xml version="1.0" encoding="utf-8"?>

<LinearLayout xmlns:android="http://schemas.android.com/apk/res/android"
android:orientation="vertical"
android:layout_width="fill_parent"
android:layout_height="fill_parent"
>
<TextView
android:layout_width="fill_parent"
android:layout_height="wrap_content"
android:text="@string/hello"
/>
<EditText
android:id="@+id/input"
android:layout_width="fill_parent"
android:layout_height="wrap_content"
android:text="@string/hello"
/>
<Button
android:id="@+id/startalave"
android:layout_width="fill_parent"
android:layout_height="wrap_content"
android:text="Start Slave App"
/>
</LinearLayout>


Slave App:
package com.test.AndroidSlave;


import android.app.Activity;
import android.os.Bundle;
import android.widget.TextView;
import android.widget.Toast;

public class AndroidSlaveActivity extends Activity {

TextView textOut;

/** Called when the activity is first created. */
@Override
public void onCreate(Bundle savedInstanceState) {
super.onCreate(savedInstanceState);
setContentView(R.layout.main);
textOut = (TextView)findViewById(R.id.output);

Toast.makeText(AndroidSlaveActivity.this,
"onCreate", Toast.LENGTH_LONG).show();

Bundle bundle = this.getIntent().getExtras();

if (bundle==null){
textOut.setText("Self start without bundle");
}else{
String textPassed = bundle.getString("key");

if(textPassed == null){
textOut.setText("No text passed");
}else{
textOut.setText(textPassed);
}
}
}

}


<?xml version="1.0" encoding="utf-8"?>

<LinearLayout xmlns:android="http://schemas.android.com/apk/res/android"
android:orientation="vertical"
android:layout_width="fill_parent"
android:layout_height="fill_parent"
>
<TextView
android:layout_width="fill_parent"
android:layout_height="wrap_content"
android:text="@string/hello"
/>
<TextView
android:id="@+id/output"
android:layout_width="fill_parent"
android:layout_height="wrap_content"
/>
</LinearLayout>


Related post:
- Check if a app is instlled

Start a specified app

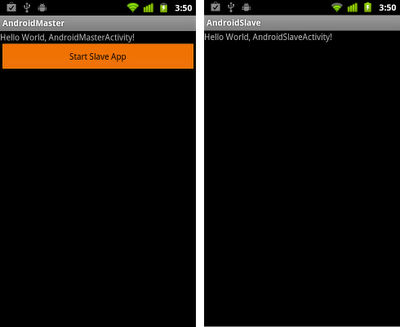
If you want to start another app directly, you can use the code intent.setClassName(PACKAGE_NAME, CLASS_NAME) to specify the expected app.
where:
- PACKAGE_NAME is the name of the package.
- CLASS_NAME is the name of the class inside the package.

For example, we have another installed app in package "com.test.AndroidSlave", we can start the activity "com.test.AndroidSlave.AndroidSlaveActivity" inside the package.

Start a specified app

package com.test.AndroidMaster;


import android.app.Activity;
import android.content.Intent;
import android.os.Bundle;
import android.view.View;
import android.widget.Button;

public class AndroidMasterActivity extends Activity {

final static String PACKAGE_NAME = "com.test.AndroidSlave";
final static String CLASS_NAME = "com.test.AndroidSlave.AndroidSlaveActivity";

Button btnStartSlave;

/** Called when the activity is first created. */
@Override
public void onCreate(Bundle savedInstanceState) {
super.onCreate(savedInstanceState);
setContentView(R.layout.main);
btnStartSlave = (Button)findViewById(R.id.startalave);
btnStartSlave.setOnClickListener(new Button.OnClickListener(){

@Override
public void onClick(View arg0) {
// TODO Auto-generated method stub
startSlave();
}});
}

private void startSlave(){
Intent intent = new Intent();
intent.setClassName(PACKAGE_NAME, CLASS_NAME);
startActivity(intent);
}
}


Next post:
- Start a specified app with data passed
- Check if a app is instlled


Aug 4, 2011

Handle both onTap(GeoPoint p, MapView mapView) and onTap(int index) implemented in MapView

Refer to the last two post Detect touch, onTap(int index), on marker in MapView and Detect touch on MapView, onTap(GeoPoint p, MapView mapView); if both callback methods are implemented, onTap(GeoPoint p, MapView mapView) will always captured the event and onTap(int index) will never called.

Handle both onTap(GeoPoint p, MapView mapView) and onTap(int index) implemented in MapView

One of the solution is to call super method in onTap(GeoPoint p, MapView mapView). If super method have handled the event, return with true; otherwise perform as normal.

 @Override
 public boolean onTap(GeoPoint p, MapView mapView) {
  // TODO Auto-generated method stub
  
  if(super.onTap(p, mapView)){
   return true;
  }
  
  String title = "pt:" + String.valueOf(overlayItemList.size() + 1);
  String snippet = "geo:\n"
    + String.valueOf(p.getLatitudeE6()) + "\n"
    + String.valueOf(p.getLongitudeE6());
  
  addItem(p, title, snippet);
  
  return true;
 }

 @Override
 protected boolean onTap(int index) {
  // TODO Auto-generated method stub
  //return super.onTap(index);
  
  Toast.makeText(context,
    "Touch on marker: \n" + overlayItemList.get(index).getTitle(),
    Toast.LENGTH_LONG).show();
  
  return true;
 }

Next:
- Switch Activity once a marker on a MapView tapped


Aug 3, 2011

Detect touch on MapView, onTap(GeoPoint p, MapView mapView)

Last post discussed how to Detect touch on marker in MapView. Alternatively, we can override the callback method onTap(GeoPoint p, MapView mapView) of ItemizedOverlay to detect touch on MapView in any position. The callback method passed with two parameter, The first parameter, geoPoint p, is the corsponding coordinate of the point of touch.

example:

Detect touch on MapView, onTap(GeoPoint p, MapView mapView), to add marker.

Modify from last post, Detect touch on marker in MapView. Override the method onTap(GeoPoint p, MapView mapView) to add marker on the map.

 @Override
public boolean onTap(GeoPoint p, MapView mapView) {
// TODO Auto-generated method stub

String title = "pt:" + String.valueOf(overlayItemList.size() + 1);
String snippet = "geo:\n"
+ String.valueOf(p.getLatitudeE6()) + "\n"
+ String.valueOf(p.getLongitudeE6());

addItem(p, title, snippet);

return true;
}


next:
- Handle both onTap(GeoPoint p, MapView mapView) and onTap(int index) implemented in MapView

Aug 2, 2011

Detect touch on marker in MapView

By overriding of the onTap(int index) callback method of ItemizedOverlay extended class, we can detect the touched item with index.

Detect touch on marker in MapView

implement MyItemizedOverlay.java class extends ItemizedOverlay
package com.AndroidMapView;

import java.util.ArrayList;

import android.content.Context;
import android.graphics.Canvas;
import android.graphics.drawable.Drawable;
import android.widget.Toast;

import com.google.android.maps.GeoPoint;
import com.google.android.maps.ItemizedOverlay;
import com.google.android.maps.MapView;
import com.google.android.maps.OverlayItem;

public class MyItemizedOverlay extends ItemizedOverlay<OverlayItem> {

private ArrayList<OverlayItem> overlayItemList = new ArrayList<OverlayItem>();
Context context;

public MyItemizedOverlay(Drawable marker, Context c) {
super(boundCenterBottom(marker));
// TODO Auto-generated constructor stub
populate();
context = c;
}

@Override
protected boolean onTap(int index) {
// TODO Auto-generated method stub
//return super.onTap(index);

Toast.makeText(context,
"Touch on marker: \n" + overlayItemList.get(index).getTitle(),
Toast.LENGTH_LONG).show();

return true;
}

public void addItem(GeoPoint p, String title, String snippet){
OverlayItem newItem = new OverlayItem(p, title, snippet);
overlayItemList.add(newItem);
populate();
}

@Override
protected OverlayItem createItem(int i) {
// TODO Auto-generated method stub
return overlayItemList.get(i);
}

@Override
public int size() {
// TODO Auto-generated method stub
return overlayItemList.size();
}

@Override
public void draw(Canvas canvas, MapView mapView, boolean shadow) {
// TODO Auto-generated method stub
super.draw(canvas, mapView, shadow);
}
}


main code AndroidMapViewActivity.java
package com.AndroidMapView;

import com.google.android.maps.GeoPoint;
import com.google.android.maps.MapActivity;
import com.google.android.maps.MapView;

import android.graphics.drawable.Drawable;
import android.os.Bundle;

public class AndroidMapViewActivity extends MapActivity {
/** Called when the activity is first created. */
@Override
public void onCreate(Bundle savedInstanceState) {
super.onCreate(savedInstanceState);
setContentView(R.layout.main);
MapView mapView = (MapView) findViewById(R.id.mapview);
mapView.setBuiltInZoomControls(true);

Drawable marker=getResources().getDrawable(android.R.drawable.star_big_on);
int markerWidth = marker.getIntrinsicWidth();
int markerHeight = marker.getIntrinsicHeight();
marker.setBounds(0, markerHeight, markerWidth, 0);


MyItemizedOverlay myItemizedOverlay
= new MyItemizedOverlay(marker, AndroidMapViewActivity.this);
mapView.getOverlays().add(myItemizedOverlay);

GeoPoint myPoint1 = new GeoPoint(0*1000000, 0*1000000);
myItemizedOverlay.addItem(myPoint1, "myPoint1", "myPoint1");
GeoPoint myPoint2 = new GeoPoint(50*1000000, 50*1000000);
myItemizedOverlay.addItem(myPoint2, "myPoint2", "myPoint2");
}

@Override
protected boolean isRouteDisplayed() {
// TODO Auto-generated method stub
return false;
}
}


layout, main.xml. Please note that you have to insert your own Map API Key.
<?xml version="1.0" encoding="utf-8"?>
<LinearLayout xmlns:android="http://schemas.android.com/apk/res/android"
android:orientation="vertical"
android:layout_width="fill_parent"
android:layout_height="fill_parent"
>
<TextView
android:layout_width="fill_parent"
android:layout_height="wrap_content"
android:text="@string/hello"
/>
<com.google.android.maps.MapView
android:id="@+id/mapview"
android:layout_width="fill_parent"
android:layout_height="fill_parent"
android:clickable="true"
android:apiKey="--- Insert your own MAP API Key here ---" />

</LinearLayout>


AndroidManifest.xml, to include uses-library of "com.google.android.maps" and permission of "android.permission.INTERNET".
<?xml version="1.0" encoding="utf-8"?>
<manifest xmlns:android="http://schemas.android.com/apk/res/android"
package="com.AndroidMapView"
android:versionCode="1"
android:versionName="1.0">
<uses-sdk android:minSdkVersion="4" />

<application android:icon="@drawable/icon" android:label="@string/app_name">
<uses-library android:name="com.google.android.maps" />
<activity android:name=".AndroidMapViewActivity"
android:label="@string/app_name">
<intent-filter>
<action android:name="android.intent.action.MAIN" />
<category android:name="android.intent.category.LAUNCHER" />
</intent-filter>
</activity>

</application>
<uses-permission android:name="android.permission.INTERNET"/>
</manifest>


next post:
- Detect touch on MapView, onTap(GeoPoint p, MapView mapView)
- Handle both onTap(GeoPoint p, MapView mapView) and onTap(int index) implemented in MapView

Infolinks In Text Ads